Authorization management
Only with the authorization of the account, third-party applications can access and control the devices under the account, and the Aqara developer platform can push the device messages under the account to the third-party server.
Currently there are three types of authorization:
- Aqara account: refers to the phone number and email account registered through Aqara systems such as Aqara Home APP, Aqara Developer Platform, etc. Users can log in to Aqara Home APP through this account, bind devices, control devices or linkage configuration;
- Project: refers to the project created through the Aqara IoT Solution Platform, and the user can bind the devices to the project through the provided implementation tool;
- Virtual account: refers to the virtual aqara account created through the interface, and the user can bind devices to the virtual account through the open SDK or implementation tools.
Interface Authorization
Third-party applications can obtain user-related authorization permissions through API interfaces to allow third-party applications to access user-related information (such as device lists, control devices, linkage configuration, etc.) without providing user names and passwords to third-party applications.
Obtain Aqara account authorization through API
Step 1 Obtain the authorization verification code through Aqara account, and send the verification code via SMS or email;
Step 2 Obtain the accessToken through the authorization verification code;
Step 3 If the accessToken expires, refresh the accessToken through refreshToken to obtain new accessToken and refreshToken;
Step 4 Access other API interfaces through accessToken.
The sequence diagram of the authorization process is shown below, and the interface details can be found on the Aqara Account Authorization Management page.

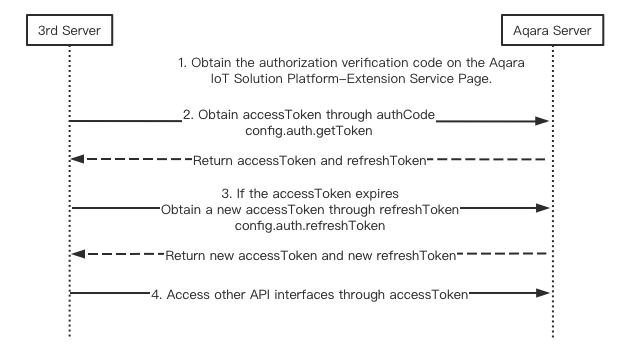
Obtain project authorization through API
Step 1 Register and log in to Aqara IOT Solution Platform, create a project, select the project that needs to be authorized-Extension service page, obtain the authorization verification code;
Step 2 Obtain the accessToken through the authorization verification code;
Step 3 If the accessToken expires, refresh the accessToken through refreshToken to obtain new accessToken and refreshToken;
Step 4 Access other API interfaces through accessToken.
The sequence diagram of the authorization process is shown below, and the interface details can be found on the Project Authorization Management page.
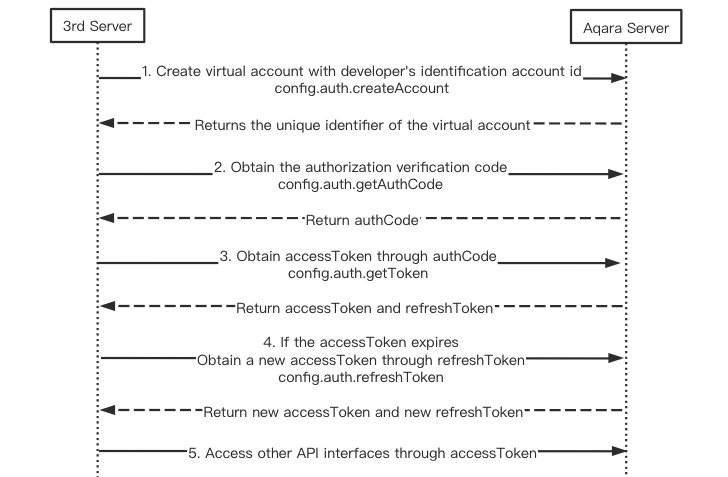
Obtain virtual account authorization through API**
Step 1 Create an virtual account through developer's identification account id, and obtain the virtual user's unique identifier id (
openid);Step 2 Obtain the authorization verification code through developer's identification account id;
Step 3 Obtain the accessToken through the authorization verification code;
Step 4 If the accessToken expires, refresh the accessToken through refreshToken to obtain new accessToken and refreshToken;
Step 5 Access other API interfaces through accessToken.
The sequence diagram of the authorization process is shown below, and the interface details can be found on the Virtual Account Authorization Management page.