Message Push Mode
The Aqara developer platform supports proactively pushing devices or linkage related data to third-party applications through the following two methods to meet users' requirements for message real-time and message persistence.
Get messages based on message queue
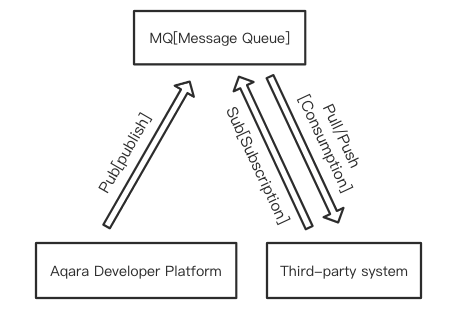
The message queue is currently based on the open source rocketmq for related transformations. The Aqara developer platform will push messages to MQ, subscribe to the required messages for consumption processing. Lumi will keep the messages generated in the last 12 hours in MQ to provide third-party applications for consumption processing.
Get messages based on HTTP
The Aqara developer platform obtains messages by calling the http service address provided by a third party. After the push address configuration is completed, the service address that receives the push message will be verified from time to time to ensure the reliability of the service address and the message receiving response mechanism Accuracy. At the same time, statistics on push failures will also be made. For example, when the failure rate of push messages exceeds 5% within 5 minutes, the third-party application will be notified by SMS or email to process in time, otherwise it will be suspended after half an hour after the notification is sent. If you need to re-enable it, please re-enable the push function in Console to receive push messages again.
Lumi will keep messages about push failures in the last 12 hours and provide API for query.
Request Demo
Request URL: The message receiving address configured on the message push page. (Login to Aqara Developer Platform-Console, Application Management-Message push settings page), example: https://xx.xx.com/aqara/app/message
Request Method: HTTP POST (application/json)
Request header parameters:
| Name | Type | Is required? | Description |
|---|---|---|---|
| token | String | Yes | A valid accessToken for the authorized account |
| time | String | Yes | Request time |
| nonce | String | Yes | Request a random number to guarantee the uniqueness of the request |
| appkey | String | No | Request the signature key If the configuration is turned on, it will be returned. |
| sign | String | No | Request signature If the configuration is turned on, it will be returned. |
Signature rules:
The parameters(appkey, nonce, token, time) requested by the head are first sorted according to the ASCII code, and then spliced.
Splice method: appkey=xxx&nonce=xxx&time=xxx&token=xxx
Splice appSecret with the string generated in the second step.
Example: appkey=xxx&nonce=xxx&time=xxx&appSecret
Do lowercase processing for the string generated in the second step.
MD5 32-bit for the character generated in the third step, and the generated number is the value of Sign.
Note: Sign is not enabled by default. If you need to enable signature, you need to configure appKey (signature Key) and appSecret (signature secret key) on Aqara Developer Platform -Console, Application Management-Message push settings page.
------------------------------------Step 1: splicing header parameters ---------------------
appkey=532cad73c5493193d63d367016b98b27&Nonce=C6wuzd0Qguxzelhb&Time=1618914078668&token=4e693d54d75db580a56d1263
------------------------------------Step 2: Splicing appSecret parameters ------------------
appkey=532cad73c5493193d63d367016b98b27&Nonce=C6wuzd0Qguxzelhb&Time=1618914078668&token=4e693d54d75db580a56d1263gU7Qtxi4dWnYAdmudyxni52bWZ58b8uN
------------------------------------Step 3: Lowercase the string ---------------------------
appkey=532cad73c5493193d63d367016b98b27&nonce=c6wuzd0qguxzelhb&time=1618914078668&token=4e693d54d75db580a56d1263gu7qtxi4dwnyadmudyxni52bwz58b8un
------------------------------------Step 4: MD5 32-bit encryption --------------------------
0e27da9f4c88c27896d1393a64d70392
Request Body parameters: For details, please refer to the "message push format" page.
Response Format
{
    "code":0
}
Note: When the third-party system receives the pushed HTTP message, please return it according to the above example. If the return format does not meet the requirements, the Aqara system will consider the third-party receiving message system service abnormal, and will stop performing the third-party system under certain conditions.
Configuration method
Log in to Aqara Developer Platform, enter Console in the upper right corner;
Click Application Management, create an application, and enter the application details;
Select the "Message Push Settings" page and fill in the configuration information as needed;
Subscription mode: Supports "All reception mode", "All reception mode (trait)" and "User-defined subscription mode".
All reception mode means that after the configuration is complete, all the device data of the authorized account will be pushed to the third-party server, and the information subscribed through the "resource subscription" interface will automatically become invalid, and the subscription interface will refuse access.
All reception mode (trait) means that after the configuration is complete, all the trait value data of the authorized account will be pushed to the third-party server, and the information subscribed through the "trait subscription" interface will automatically become invalid, and the subscription interface will refuse access.
User-defined subscription mode refers to subscribing to specified device resource data through the "subscribe resource" interface, and only pushes the data to a third-party server.
Push Channel: Supports "Message Queue Push" and "HTTP Push".
Push configuration address: If the "Push Channel" is configured when "HTTP Push" is selected, enter the address of the server that needs to receive messages, and verify that the server is connected.
Key ID: If the "Push Channel" is configured when "Message Queue Push" is selected, select the corresponding key ID.
Push Status: After the push configuration address is verified successfully, you can set whether push is enabled or not.
Remarks: Fill in the remarks of the message push.
Save the configuration.
Java Demo
<dependency>
    <groupId>org.apache.rocketmq</groupId>
    <artifactId>rocketmq-acl</artifactId>
    <version>4.5.2</version>
</dependency>
<dependency>
    <groupId>org.apache.rocketmq</groupId>
    <artifactId>rocketmq-client</artifactId>
    <version>4.5.2</version>
</dependency>
package com.lumi.aiot.cloud.utils;

import org.apache.rocketmq.acl.common.AclClientRPCHook;
import org.apache.rocketmq.acl.common.SessionCredentials;
import org.apache.rocketmq.client.consumer.DefaultMQPushConsumer;
import org.apache.rocketmq.client.consumer.listener.ConsumeConcurrentlyContext;
import org.apache.rocketmq.client.consumer.listener.ConsumeConcurrentlyStatus;
import org.apache.rocketmq.client.consumer.listener.MessageListenerConcurrently;
import org.apache.rocketmq.client.consumer.rebalance.AllocateMessageQueueAveragely;
import org.apache.rocketmq.client.exception.MQClientException;
import org.apache.rocketmq.common.UtilAll;
import org.apache.rocketmq.common.consumer.ConsumeFromWhere;
import org.apache.rocketmq.common.message.MessageExt;

import java.util.List;

/**
 * @Author: zzm
 * @Date: 2021/5/27 10:41
 */
public class MqConsumer {

    private final String mqAddress = "3rd-subscription.aqara.cn:9876";
    private final String appId = "06699244921c39c91e012252";
    private final String keyId = "K.761236781237217";
    private final String appKey = "cqLCZDxt4PgMOPrFyHVYReygeyX1z2rP";

    public static void main(String[] args) {
        MqConsumer mqConsumer = new MqConsumer();

        try {
            mqConsumer.start();
            Thread.sleep(1000000L);
        } catch (Exception e) {
            e.printStackTrace();
        }
    }

    public void start() throws MQClientException {

        AclClientRPCHook acl = new AclClientRPCHook(new SessionCredentials(keyId, appKey));
        //设置消费者组
        DefaultMQPushConsumer consumer = new DefaultMQPushConsumer(appId, acl, new AllocateMessageQueueAveragely());

        consumer.setVipChannelEnabled(false);
        consumer.setNamesrvAddr(mqAddress);
        //设置消费者端消息拉取策略,表示从哪里开始消费
//        consumer.setConsumeFromWhere(ConsumeFromWhere.CONSUME_FROM_LAST_OFFSET);
//        consumer.setConsumeTimestamp(UtilAll.timeMillisToHumanString3(
//                System.currentTimeMillis() - (1000 * 10 * 1)));

        //设置从10分钟前开始消费,配合setConsumeTimestamp一起使用,格式yyyyMMddhhmmss
        consumer.setConsumeFromWhere(ConsumeFromWhere.CONSUME_FROM_TIMESTAMP);
        consumer.setConsumeTimestamp(UtilAll.timeMillisToHumanString3(System.currentTimeMillis() - 1000 * 60 * 10));

        //设置消费者拉取消息的策略,*表示消费该topic下的所有消息,也可以指定tag进行消息过滤
        consumer.subscribe(appId, "*");

        //消费者端启动消息监听,一旦生产者发送消息被监听到,就打印消息,和rabbitmq中的handlerDelivery类似
        consumer.registerMessageListener(new MessageListenerConcurrently() {

            @Override
            public ConsumeConcurrentlyStatus consumeMessage(List<MessageExt> msgs, ConsumeConcurrentlyContext context) {
                try {
                    for (MessageExt messageExt : msgs) {
                        String topic = messageExt.getTopic();
                        String tag = messageExt.getTags();
                        String msg = new String(messageExt.getBody());

                        log.info("******device info******{}", msg);
                    }
                } catch (Exception e) {
                    e.printStackTrace();
                }

                return ConsumeConcurrentlyStatus.CONSUME_SUCCESS;
            }
        });

        //调用start()方法启动consumer
        consumer.start();
    }

}